2026-2
- BrightWork 365 ships with Starter Project Templates out of the box - see article BrightWork 365 Starter Project Templates for details.
- When creating projects and choosing their programs and portfolios, consider security and access as described in the articles Portfolio Security & Access and Project Security & Access.
Project Override Settings are not copied to content templates from their reference projects.
Method 1: Create Projects with a Request
The project management lifecycle will typically begin with BrightWork 365 Requests, where a Requester submits a new project request along with details needed for an approval decision. Through workflows, notifications and reports, the request process affords users an efficient method for starting the project management process. You can find detailed information about the formal request process in the Requests section of the Knowledge Base.
Method 2: Create Projects without a Request
Some organizations will not need a formal request process for all of their projects and will therefore allow certain users to create projects directly in the Projects app section. Users with the BrightWork Project Manager or BrightWork PMO Manager security role will be able to create projects from a template using a simple interface skipping the formal request process.
If a user with the necessary security role clicks + New in Projects, they will be presented with a project creation form. After filling in all necessary column values, set the Create switch to Yes to initiate the project creation process.
Projects > + New Project button:

A project can also be created directly in it associated parent program.

After setting the Create switch to Yes to initiate the project creation process, click Close immediately in the dialog presented on the screen ("Your project is being created...) to avoid subsequently locking the created project in read-only mode. You will receive an email after the project creation process has completed, and it is possible to load the project.

Content Templates

-
If the Template selected is not associated with a Content Template (a template with predefined data), the project will be created instantly, and the form will transition to the Project form. When the project is ready to be used, the user that initiated the creation process will receive an email.
-
If the Template selected is associated with a Content Template, the form will not transition to the Project form until the Create Project Flow has completed processing. The user that initiated the project creation process will receive an email when the flow has completed. The duration of the project creation process will depend on the number of child rows (Tasks, Issues, Risks, etc.) present in the Content Template. When the project is ready to be used, the user that initiated the creation process will receive an email.
-
The Content Template field is not locked and therefore if there is no content template currently associated with the project, one can be chosen, or the currently chosen content template can be swapped for a different one.
Troubleshooting
Persistent 'Creating Project' dialog & project is read-only
Resolution:
- Click Projects in the main nav.
- Create a new view with the Create, Create Project Running, and Switch columns exposed, and without any icon columns included such as the Health icon, etc. (you cannot use Excel Online to edit a view that contains an icon column).
- For the affected project, use Excel Online with the new view to set the Create column to No, set the Create Project Running column to No, and set the Switch column set to Yes.
- Open the affected project and click Activate on the Project toolbar.
Script errors when creating a project
Resolution:
In the associated Project Template, ensure there are values in the Approvals Coordinator field and in all of the New Project Defaults fields.
When creating a project from a subgrid (e.g., in Programs), the New Project form does not load, and an error is displayed
Resolution:
Select the New Project form from the form switcher.

2026-1 & 2025-2
- BrightWork 365 ships with Starter Project Templates out of the box - see article Project Templates.
- When creating projects and choosing their programs and portfolios, consider security and access as described in the articles Portfolio Security & Access and Project Security & Access.
- Customers that have upgraded from prior version of BrightWork 365 have the option to choose either a new version template included in a later version of BrightWork 365 from the Project Templates table, or one of the older version templates from the Templates table. To choose, click the search icon and click one of the options.
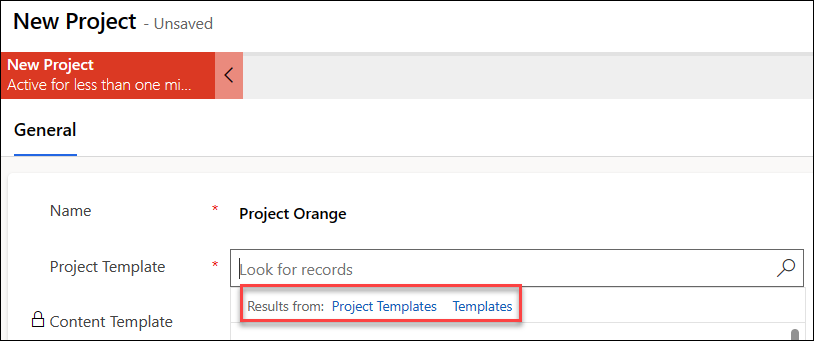 The newer version Project Templates can be identified by icon
 , and older version Project Templates by icon
 .
.
 The newer version Project Templates can be identified by icon
 , and older version Project Templates by icon
 .
.Project Override Settings are not copied to content templates from their reference projects.
Method 1: Create Projects with a Request
The project management lifecycle will typically begin with BrightWork 365 Requests, where a Requester submits a new project request along with details needed for an approval decision. Through workflows, notifications and reports, the request process affords users an efficient method for starting the project management process. You can find detailed information about the formal request process in the Requests section of the Knowledge Base.
Method 2: Create Projects without a Request
Some organizations will not need a formal request process for all of their projects and will therefore allow certain users to create projects directly in the Projects app section. Users with the BrightWork Project Manager or BrightWork PMO Manager security role will be able to create projects from a template using a simple interface skipping the formal request process.
If a user with the necessary security role clicks + New in Projects, they will be presented with a project creation form. After filling in all necessary column values, set the Create switch to Yes to initiate the project creation process.
Projects > + New Project button:
A project can also be created directly in it associated parent program.

-
If the Template selected is not associated with a Content Template (a template with predefined data), the project will be created instantly, and the form will transition to the Project form. When the project is ready to be used, the user that initiated the creation process will receive an email.
-
If the Template selected is associated with a Content Template, the form will not transition to the Project form until the Create Project Flow has completed processing. The user that initiated the project creation process will receive an email when the flow has completed. The duration of the project creation process will depend on the number of child rows (Tasks, Issues, Risks, etc.) present in the Content Template. When the project is ready to be used, the user that initiated the creation process will receive an email.
After setting the Create switch to Yes to initiate the project creation process, click Close immediately in the dialog presented on the screen ("Your project is being created...) to avoid subsequently locking the created project in read-only mode. You will receive an email after the project creation process has completed, and it is possible to load the project.
Troubleshooting
Persistent 'Creating Project' dialog & project is read-only
Resolution:
- Click Projects in the main nav.
- Create a new view with the Create, Create Project Running, and Switch columns exposed, and without any icon columns included such as the Health icon, etc. (you cannot use Excel Online to edit a view that contains an icon column).
- For the affected project, use Excel Online with the new view to set the Create column to No, set the Create Project Running column to No, and set the Switch column set to Yes.
- Open the affected project and click Activate on the Project toolbar.
Script errors when creating a project
Resolution:
In the associated Project Template, ensure there are values in the Approvals Coordinator field and in all of the New Project Defaults fields.
When creating a project from a subgrid (e.g., in Programs), the New Project form does not load, and an error is displayed
Resolution:
Select the New Project form from the form switcher.
