Project Management Context
The BrightWork 365 Communications tab provides a comprehensive method for capturing various communication related activities at the project, program, or portfolio level. To access Communications, click on the Communications tab. The initial screen will display a history of previously entered Communications items. Click "+" to create a new Communications item of type Appointment, Email, Phone Call, or Note.

You can also access communications options from within the Timeline section of a Project Stage details screen.

Appointment
When creating a new Appointment the Quick Create form will display with relevant fields. If the creator's email and calendar are configured properly, an invite will be sent to the Attendees, and the appointment will be added to the creator's calendar and displayed as 'Free' by default.
The Appointment Related tab provides access the Audit History of the Appointment item. The Audit History provides data change details including the change date, user who made the change, the changed field, and the old and new values.
Appointments can be set as a Microsoft Teams meeting. If your organization is not yet configured to work with Teams, see Microsoft Teams.
The new email screen presents the typical email fields such as To, CC, Subject, and email body. If the email creator's email is configured properly, an email will be sent to the addressees and a copy of the email will be saved in the Communications item record.
Phone Call
The Phone Call function provides a way to capture details about a call that was initiated outside the system. The details will be saved as part of the Communication record.
The Phone Call Related tab provides access the Audit History of the Appointment item. The Audit History provides data change details including the change date, user who made the change, the changed field, and the old and new values.
Note
You can create a note with a title, note body (with formatting), and attachments and save the note as part of the Communications record. Information about the note includes its Modified time, which reflects anything that changes the contents of any column in the record, including system columns.
OneNote
In addition to the standard note mentioned above, you also have the option to create Microsoft OneNote notes that are saved as part of an associated OneNote notebook. To access the OneNote notebook after it's created, you can either click on the OneNote link displayed when you click the + sign in the Communications module:

Or,
click on the .one file within the Documents tab:

Communications Tab - User Actions
You can take various actions on open Communications items directly in the main Communications screen.

If you need to delete a closed Communications item, e.g., delete an email after it was sent, you will need to do this from the toolbar within the item record instead of from the main Communications screen.

Users can only modify or delete their own Communications activities, not those of other users.
Dynamics 365 App for Outlook
If the Dynamics 365 App for Outlook has been activated by your administrator (see the related admin instructions in our BrightWork 365 Install Guide.pdf), you will have the ability to interact with and manage BrightWork 365 related emails and calendar items while using Outlook on the desktop, web, or mobile. See Microsoft article Use Dynamics 365 App for Outlook | Microsoft for additional information.
Troubleshooting
Communication activities not working for some users
A Power Platform Admin can check within the BrightWork 365 app if the affected user accounts are enabled for communication related activities:
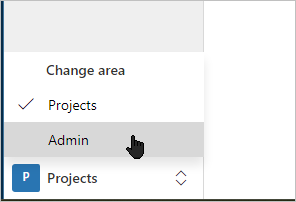
- Click Projects in the bottom left of the page and click Admin.
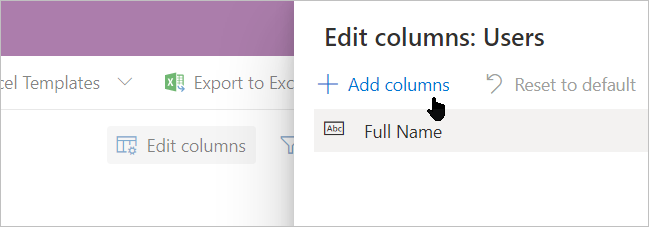
- Click Users to load the BrightWork Users report.
- Click Edit columns and then click Add columns.
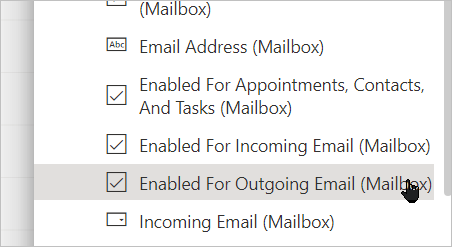
- Click Related and Select Mailbox.

- Add the three Enabled for… columns.
- Scroll down to the bottom and click close.
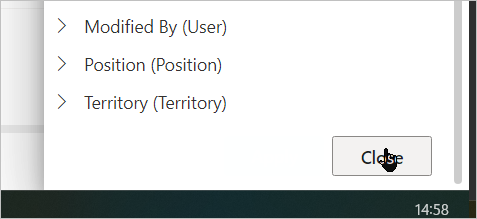
- Click Apply.
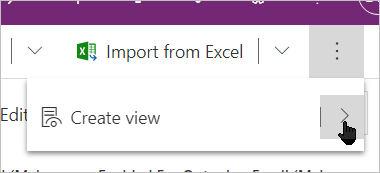
- Expand the three dots in the top right and click the arrow beside Create view.
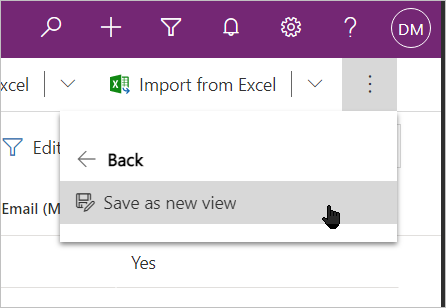
- Click Save as new view.
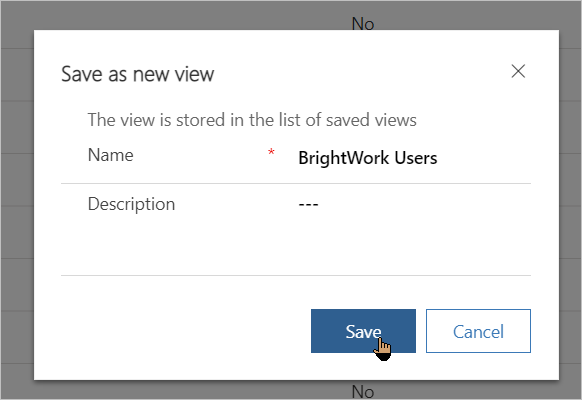
- Rename the view if desired (optional) and click Save.
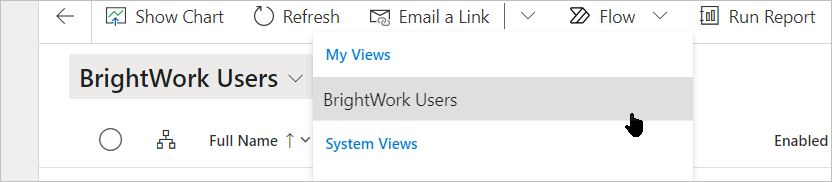
- The new view is available to check if the user accounts are enabled for communication related activities.


If further configuration is required, see the Setup Dynamics Email section of the BrightWork 365 Install Guide.pdf.
